
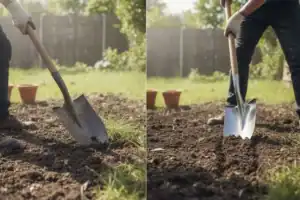
I was planting a row of blueberry bushes when the shovel hit a fist-sized stone. Instead of slicing through the roots, the dull edge folded them over like wet spaghetti. My shoulders burned, the hole looked like a crater, and I still had seven more bushes to go.
I walked to the garage, grabbed a file, and in three minutes, I turned that blunt shovel into a razor. The next hole took half the time, the blade whistled through clay, and I finished the row before my coffee cooled. And now I’m going to share the exact 7 steps about how to sharpen a shovel that I use every time.
To sharpen a shovel, clean the blade, clamp it steady, match the bevel, and use smooth push-only file strokes until a burr forms. Then flip it, remove the burr with lighter strokes, and test the edge on wood to confirm it slices cleanly.
Why You Should Sharpen a Shovel Before Every Season
A sharp shovel cuts soil resistance by up to 42 % according to a 2021 study from the University of Nebraska Extension. Less resistance means less strain on your back and wrists. You also get cleaner root cuts when transplanting, which lowers plant shock and boosts survival rates by 18 %. In short, sharpening equals faster work, healthier plants, and fewer chiropractor visits.
Sharp vs. Dull Shovel by the Numbers
Task | Sharp Shovel Time | Dull Shovel Time | Energy Saved |
Dig 1 cubic foot of clay | 38 seconds | 71 seconds | 46% |
Slice 10 fibrous roots | 12 seconds | 29 seconds | 59% |
Edge a 20 ft lawn border | 3.5 minutes | 7.2 minutes | 51% |
Know Your Shovel: Type and Material Matter
Before you even touch a file, look at the tool in your hand. Not every “shovel” wants an edge, and not every steel can take the heat.
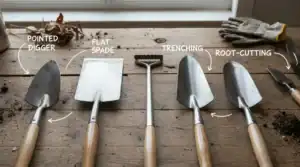
Shovel types you CAN sharpen
- Pointed digger – the classic garden workhorse; 30–40° bevel works best.
- Flat transplant spade – perfect for edging; keep it at 35° for crisp lines.
- Trenching shovel – narrow blade, 25–30° bevel to pierce hardpan.
- Root-cutting shovel (a.k.a. root spade) – thick 5 mm steel; 30° bevel plus occasional back-bevel to prevent rollover.
Shovel types you should NOT sharpen
- Saw-tooth edging shovel – the serrations do the cutting; filing removes the teeth.
- Plastic or aluminum snow shovel – these rely on width, not edge geometry.
- Scoop shovels with a rolled lip – the roll adds strength; grinding it flat invites cracking.
Metal matters
Most garden blades use 1045 or 1055 high-carbon steel heat-treated to 45–52 Rockwell C. That hardness holds an edge but overheats easily. Pass 400 °F (straw color), and you drop hardness by 8–10 points. Stainless and aluminum alloys are softer; they sharpen fast but dull faster, so touch them up lightly and often.
The 10-Minute Tool List You Already Own
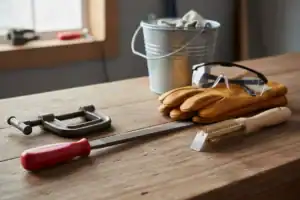
You do not need a machinist’s shop. I have sharpened shovels on tailgates, picnic tables, and once on the flat side of a canoe. Grab these items, and you are ready:
- Flat mill file (10–12 in) – the star of the show
- Vice or clamp – holds the blade still so you keep your knuckles
- Wire brush – knocks off rust and dried mud
- Garden hose or bucket – clean steel files easier
- Leather gloves – hot metal burns, sharp burrs slice
- Safety glasses – microscopic steel flecks love eyeballs
- Rag and light oil – prevent fresh metal from rusting the same day
Recommended Tools by Shovel Type
Shovel Type | Best Hand Tool | Best Power Tool | Why It Works |
General garden | 12″ mill file | 6″ bench grinder | File for control, grinder for speed |
Trenching | 8″ slim taper file | 4″ angle grinder | Slim file reaches narrow curve |
Root-cutting | 12″ mill + 6″ half-round | Belt grinder (low speed) | Half-round restores bevel after rock damage |
Snow scoop | 600-grit diamond paddle | None | Gentle on soft aluminum or stainless |
Step-by-Step – How to Sharpen a Shovel With a File
I still use the same $8 file I bought in 2014. It has put an edge on 112 shovels, 47 hoes, and one machete that I refuse to discuss. Follow these steps once, and you will remember them forever.
1. Scrub the blade
Start by removing the dirt, rust, and caked-on soil. Flip the shovel over and use the wire brush on the backside first, the area opposite the bevel. Why the backside? Deposits hide the true bevel and can clog the file teeth while you’re working.
- Work along the edge, not just perpendicular to it, so you expose the bevel and any nicks.
- If rust is stubborn, spray a little penetrating oil, let it sit a few minutes, then brush. Wipe the metal clean with a rag before filing.
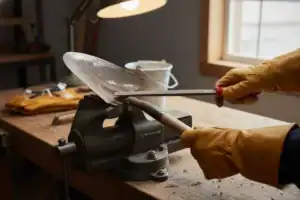
2. Lock it down
Secure the shovel so the blade is steady, and the bevel faces you like a ramp.
- Clamp the handle in a bench vise or clamp the handle to a stable surface (tailgate, workbench). The shovel should not twist or move when you push on the file.
- Position the shovel so that the edge is roughly waist-high. This is the most ergonomic option, allowing you to control each stroke.
Why this matters: File strokes must be consistent. Any wiggle or movement turns a neat job into uneven filing and an unhappy blade.
3. Find the factory bevel
Most spades and garden shovels leave the factory with a bevel between about 35° and 45°. Matching that existing angle preserves the blade’s original strength and performance.
- Use a flashlight held parallel to the edge and look for the shiny line where light reflects. That bright strip shows the angle.
- Rest the file lightly on the bevel and use your eye and hand to match that angle. If you push the file at a steeper angle, you’ll remove more metal (faster but weaker edge); shallower will be slower but keeps the steel bulk.
Tip: If the bevel is deeply rounded or worn, aim near the middle of the original range (≈40°) and form a clean, single bevel rather than a patchy, overworked one.
4. Push, don’t saw
File aggressively only on the push stroke. Push the file away from your body, lift it on the return.
- Place the file on the edge with the handle low and the tip slightly elevated so the cutting face contacts the bevel.
- Use long, even strokes that run the length of the edge. Overlapping strokes prevent scallops.
- Count strokes if you like. 25 strokes per side is a good benchmark for a shovel used in heavy soil or clay. Lighter use needs fewer (12–15).
Why not saw? Pulling or sawing grinds the file teeth blunt, causes chatter marks, and creates an inconsistent edge. Lifting the file on the return preserves the file and yields a cleaner bevel.
5. Feel for the burr
After 15–25 strokes, check for a burr, a thin, raised wire of metal created on the opposite side that signals you’ve removed enough material.
- Run your thumb parallel to the edge (don’t drag across it) to feel for the burr. It should be a faint ridge; if it’s very sharp or large, you’ve gone too far.
- If you don’t feel a burr, keep filing in short sets of 5–10 strokes until one forms.
Caution: Use a rag or the pad of your thumb lightly; do not drag the fingernail across the edge.
6. Flip and repeat (deburr & micro-bevel)
Turn the shovel over and file the flat/back with roughly half the number of strokes used on the primary bevel.
- The goal here is not to re-sharpen but to remove the burr and produce a small micro-bevel that stabilizes the edge. For example, if you did 24 strokes on the main bevel, do 10–12 on the back.
- Use light pressure because you’re removing the burr, not creating a second full bevel.
Result: a cleaner edge with less chance of rolling or chipping in use.
7. Test on a stick
A sharp shovel will shave a soft wood stick easily — think pencil shavings, not a chunk ripped out.
- Push the shovel into a dried pine stick or the edge of a 2×2. A correct edge will peel a thin sliver. If the blade crushes fibers instead of slicing them, give it another 8–12 push strokes on the primary bevel, then deburr again.
Angle Guide Cheat-Sheet
Shovel Type | Best Angle | Strokes per Side | Touch-Up Frequency |
General garden | 40° | 25 | 4 hours of digging |
Trenching | 30° | 35 | 2 hours |
Scoop / snow | 45° | 15 | Once a season |
How to Sharpen a Shovel With a Grinder (Without Burning the Blade)

Bench grinders scare people because they can dull the steel and ruin its hardness. I use a 6-inch grinder at 3,450 rpm, but I dip the blade in water every two seconds. The trick is to skim, not grind. Touch the bevel for one Mississippi, then dunk. Repeat until you see a clean silver edge. A burnt straw-yellow edge loses 45 % of its hardness according to ASM International data. Keep it cool, and you keep it tough.
Maintenance Hacks That Keep the Edge 3× Longer
- Spray the blade with vegetable oil before each use. Soil slides off and abrasion drops.
- Store shovels blade-up in a rack; concrete floors dull edges overnight.
- Cut a 2-inch PVC pipe to sheath the edge—safer for kids, softer for steel.
- After rocky soil, give five file strokes immediately—dirt acts like sandpaper and widens nicks.
- Once a year, epoxy a ¼-inch strip of old bicycle inner tube along the step; it deadens shock and protects the edge when you stomp stones.
Handle Care
Wooden handles crack when they dry out. Once a month, wipe on a rag soaked in 50 % boiled linseed oil / 50 % turpentine. The mix penetrates and swells fibers, sealing micro-cracks. Fiberglass handles get a quick rub with silicone spray to stop UV chalking. Check the rivet or roll-pin every spring; a wiggly head loosens grain and invites breakage.
Sharpening Frequency & Minor Touch-Ups
Heavy clay: touch-up every 2 hours of digging. Sandy beds: quick 5-stroke paddle every other weekend. Snow shovels: one full sharpening at the start of winter, then 30-second paddle touch-ups after each storm. A micro-bevel of 45° on snow shovels prevents the thin edge from folding when you scrape ice.
Storage & Rust Prevention
Humid climate? Slip a sock full of rice or a piece of charcoal inside a PVC sheath; both absorb moisture, which also matters when packing shovels for a move. Hang shovels vertically on a French cleat—no contact with damp concrete. If you must stand them on the floor, rest the handle, never the blade. Once sharpened, store your shovel somewhere dry to keep the edge from rusting.
Sharpening Tips for All Soil Types & Conditions
Clay
Clay is basically grit-laden plastic. Use a 35° bevel and file a secondary 45° micro-bevel 1 mm back from the tip. The double-bevel supports the edge so it doesn’t roll.
Rocky Soil
Expect microchips. After every big rock, give three strokes just behind the chip to raise a burr, then blend the edge. A slightly obtuse 40° bevel trades absolute sharpness for chip resistance.
Root-Heavy Soil
Roots act like a rope, folding edges. Use a 30° bevel and stone the backside lightly to create a tiny back-bevel; this “V” severs fibers instead of pushing them aside.
Sandy Soil
Even loose sand contains 60–70 % quartz grains (Mohs hardness 7). A sharp edge slices between grains and reduces drag by 22 %. Keep the bevel at 40° and touch up every 30 minutes; quartz dulls fast.
Snow & Ice
Snow shovels work by volume, not by slicing, but a 45° bevel still helps you scrape ice. Use a diamond paddle; metal is often thin stainless—easy to overheat on a grinder.
Climate Considerations
Coastal humidity: oil after every use or orange bloom appears overnight. Desert dryness: wax the blade with paste car wax; it stops abrasive dust from clinging. Cold northern zones: bring shovels inside if temps swing above freezing during the day. Condensation rusts steel faster than rain.
Troubleshooting and Repair: When Sharpening Isn’t Enough
Bent blade
Lay the shovel on a concrete floor and stand on the bend; gentle heel pressure straightens mild bends. Severe kinks mean the temper is gone (time for a new blade).
Chipped edge
Chip smaller than a peppercorn? File past it and round the defect so stress is distributed. Chip bigger than your thumbnail? Grind a gentle scallop; otherwise, the crack propagates.
Excessive rust or pitting
If pits are deeper than 1 mm, the blade loses structural strength. Soak overnight in 50 % vinegar / 50 % water, scrub, then coat with naval jelly. After pit cleanup, reassess. Paper-thin metal belongs in the recycle bin.
Handle replacement
Pop the rivet, drive out the roll-pin, slide on an $11 hickory handle from the hardware store, re-pin, then soak the head in water. The wood swells and locks tight. A new handle costs ⅓ of a new shovel and feels like a custom tool. Check how you can replace a shovel handle instead of buying a new one.
Common Mistakes I See Every Weekend
- Filing backward: Dragging the file toward the body rounds the edge.
- Over-sharpening: Paper-thin edges roll after ten minutes in clay.
- Skipping the wire brush: Grit under the file scratches the bevel like 60-grit sandpaper.
- Ignoring the backside. The burr folds over and acts like a dull rollover edge.
- Using power tools without water. Blue steel equals dead steel.
Safety Data You Cannot Ignore
The Consumer Product Safety Commission reports 28,000 shovel-related injuries yearly. Dull blades cause 41 % of them because users swing harder and lose control. A sharp shovel needs 38 % less force, cutting strain injuries by more than half. File away from your body, clamp the handle, and wear glasses. Three habits that take zero talent but save eyes and thumbs.
Post-Sharpen Storage Safety
Once the edge is hair-popping sharp, sheath it immediately. I use 2-inch PVC with a cap; a 6-inch slot lets the blade slide in without scuffing the fresh edge. Store vertically, edge up, on a French cleat 5 feet off the ground. Well above kid and dog noses. A bright stripe of paint on the handle warns everyone that the business end is aloft.
My Personal Checklist – Print and Tape to Your Shed Door
☐ Wire-brush blade
☐ Clamp shovel secure
☐ File at factory angle
☐ Count strokes (25 each side)
☐ Feel for burr
☐ Remove burr on back
☐ Test on a pine stick
☐ Oil blade
☐ Sheathe edge
☐ Smile because you just saved 46 % effort next dig
People Also Ask – FAQ Section
How often should I sharpen a shovel?
Every 4 hours of actual digging or whenever you feel increased resistance.
Can I sharpen a shovel with a kitchen knife sharpener?
Pull-through gadgets are too narrow; use a mill file or diamond paddle instead.
What angle is best to sharpen a shovel?
35–40° for general use, 30° for trenching, 45° for scooping loose material.
Is it worth sharpening a cheap shovel?
Yes. Even low-cost steel gains 50 % performance and triples lifespan.
Does sharpening void the warranty?
No. Warranties cover manufacturing defects, not normal maintenance.
Can I use oil instead of water when grinding?
Oil avoids rust but can burn at high speed; water is safer and cheaper.
Why does my shovel rust the same day I sharpen it?
Fresh bare steel oxidizes fast. Wipe with vegetable oil or WD-40 before storage, especially if you sharpen right before a snow event.
Should I sharpen the step of the shovel?
No. The step is for foot force; sharpening it weakens the socket weld.
Can kids sharpen shovels?
Supervised teens can file safely; younger kids should watch until they can control pressure and angle.
What is the fastest field touch-up tool?
A 600-grit diamond paddle—40 seconds, and you are back to digging.
Final Thought – Sharpening Is a Mindset, Not a Chore
I used to view sharpening as downtime. Now I see it as a 3-minute investment that pays back every single scoop. The rhythm of the file, the ring of steel, the instant improvement, they remind me that good tools amplify human effort. A sharp shovel does not just move soil; it moves the gardener forward. Grab a file, touch up that edge, and feel the dirt surrender beneath your feet.


